What is LEGO SNOT: learn to build with LEGO part 1
A SNOT summary
SNOT Basics
How does SNOT work then? The best way to explain this is with a visual guide. But first we have to make sure we speak the same language.
I will refer to the following elements and their names for the more general parts. These are stones, slabs and tiles. Bricks and slabs have studs on the top. Tiles are smooth on the top.

When we talk about widths, we measure in stud lengths, hence the abbreviation L.

When it comes to height, it's pretty common knowledge that a standard LEGO brick is the same height as three plates stacked on top of each other.

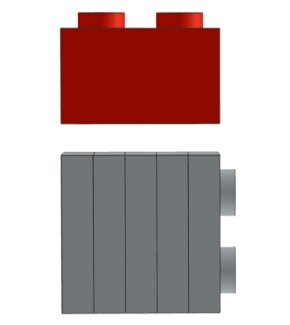
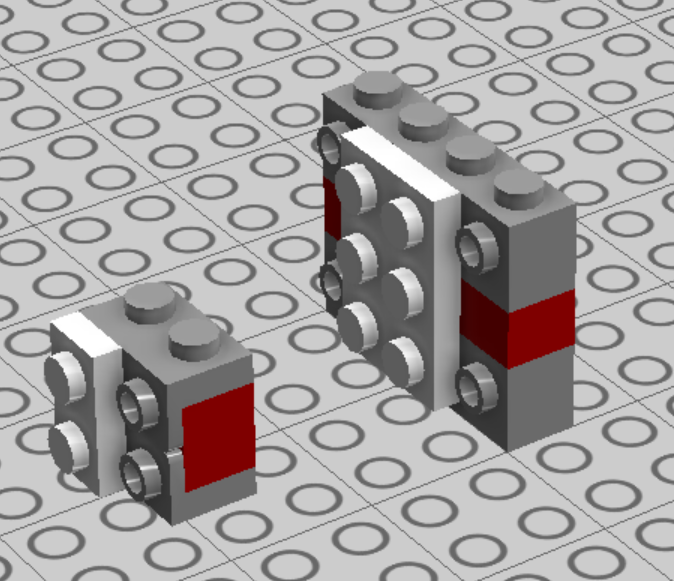
Pretty easy so far, right? Well, this is where the math gets more complicated as we start building with the studs on the side. Welcome to LEGO's first Golden Ratio! Also known as the 5:2 rule. The width of two studs is the same as the height of five plates stacked on top of each other, leaving the studs visible, as shown below.
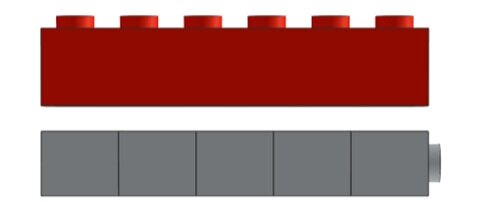
LEGO's second golden ratio is 6:5. Six studs wide is the same as the height of five stacked bricks, with the stud visible, as shown below.
SNOT Geometry
Now that these proportions have been demonstrated, we can have some fun exploring configurations (and the implications of both the 5:2 and 6:5 rules). This is where you can start aligning the studs to make LEGO both can be perfectly connected horizontally and sideways.
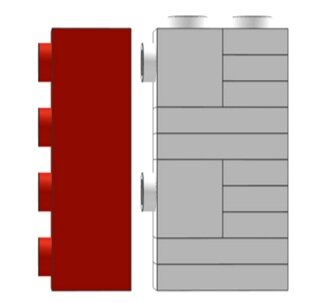

Basic SNOT geometry achieved! Now let's look at some more complex proportions by dividing the width of a LEGO style. Based on our golden ratios, the width of one stud (a 1x1 brick, for example) is equal to the height of 2½ stacked plates.
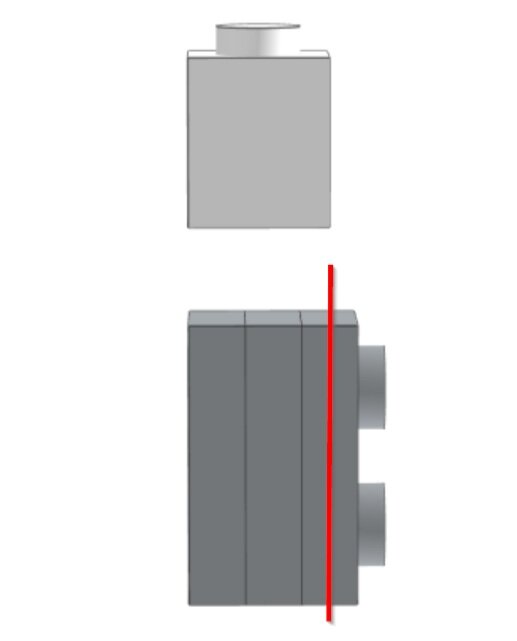
If you build SNOT structures only in two-stud increments, all you need to remember is that 2 studs are equal to 5 plates. Simple! But in many circumstances you may need to consider ½ plate offsets. The ½ plate size appears in many LEGO elements, but the trick is knowing when and how to use them.
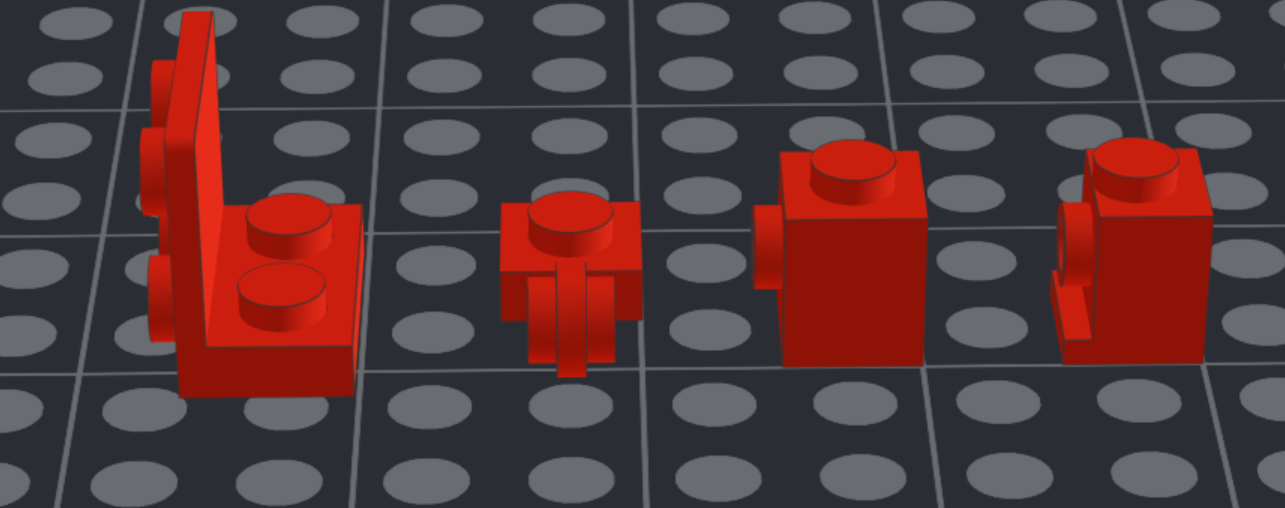
For example, in the elements above, ½ plate dimensions are shown in full. The thin part of the bracket is ½ plate thick. The thin ring of the modified plate is ½ plate. The 1x1 brick with stud on one side is 2½ plates thick, while the headlight brick in its narrowest dimension is 2 plates thick.
A visual glossary of SNOT elements and techniques
We've talked a lot about the theory of SNOT, but how do you start building SNOT structures? Let's apply some of the geometry we've learned and explore some examples of useful SNOT stones and how to use them. Each section visually introduces you to an element and some ways you can use it to change the direction of the studs.
ROCKER BEARING 1X2 ( Part 3937 )
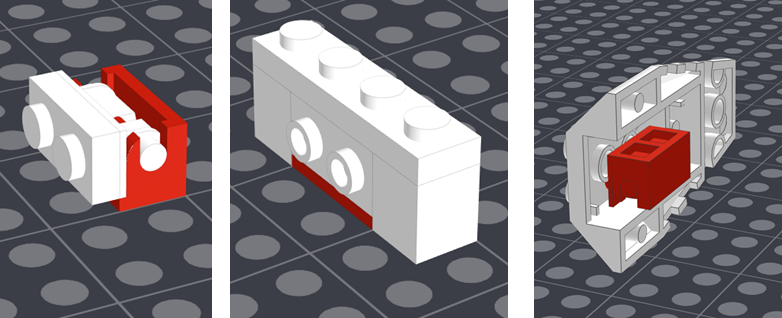
ANGULAR BRICK 1X1 ( Part 4070 ): also called the headlight brick, Erling stone or washing machine
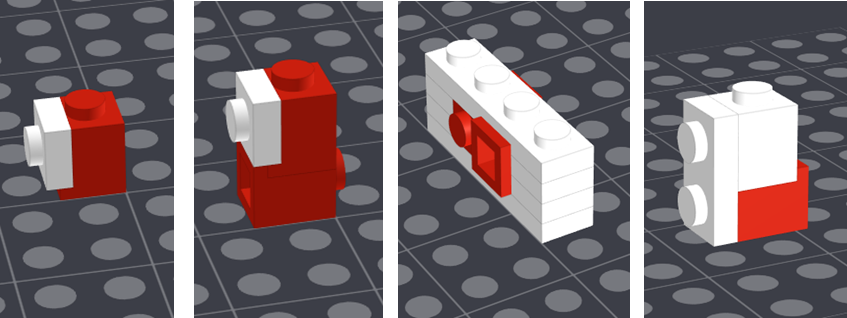
LAMP HOLDER, thin ( Part 4081a ): Older style and less common
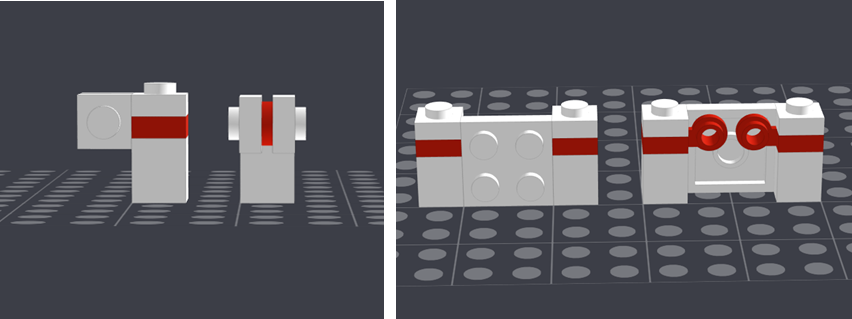
LAMP HOLDER, thick ( Part 4081b ): Watch out for that ¼ plate offset!
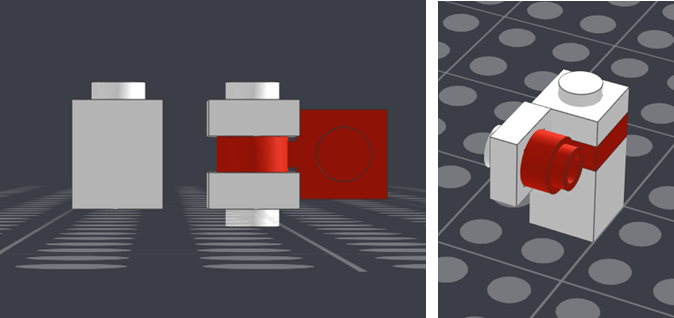
BRICK 1X1 WITH 4 KNOBS ( Part 4733 ): also called the Travis brick
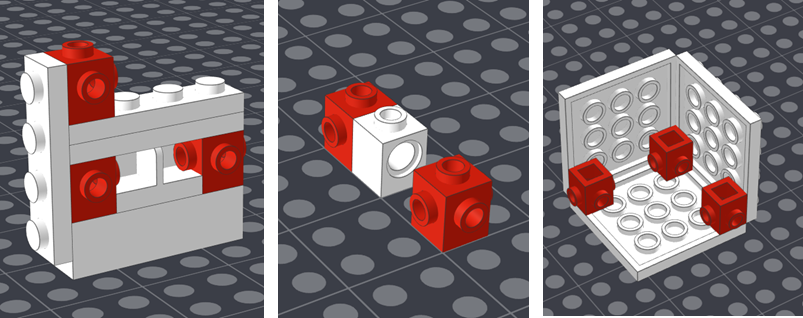
ANGLE PLATE 1X2/1X4, bracket ( Part 2436 ): The thin part of a bracket is ½ plate thick.
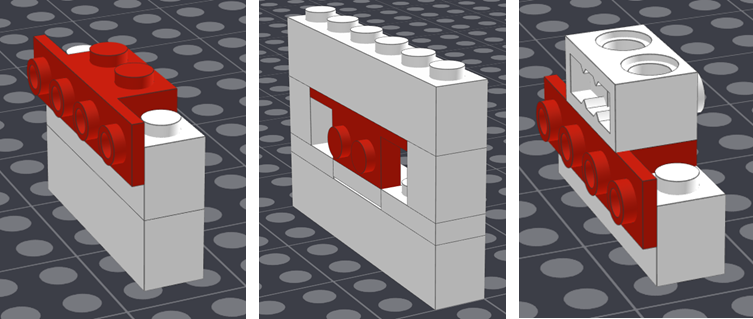
MINI FIG. BACK PLATE WITH BUTTON, neck bracket ( Part 42446 )
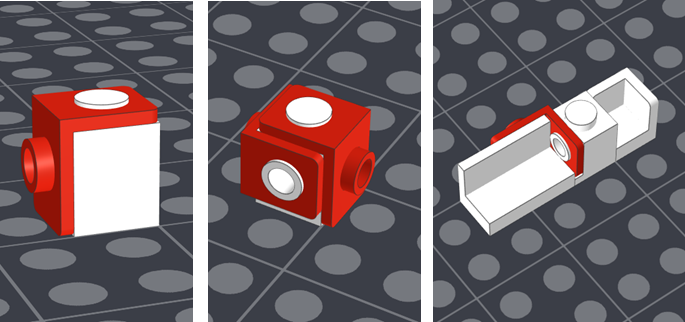
ANGLE PLATE 1X2 / 2X2, bracket ( Part 44728 )
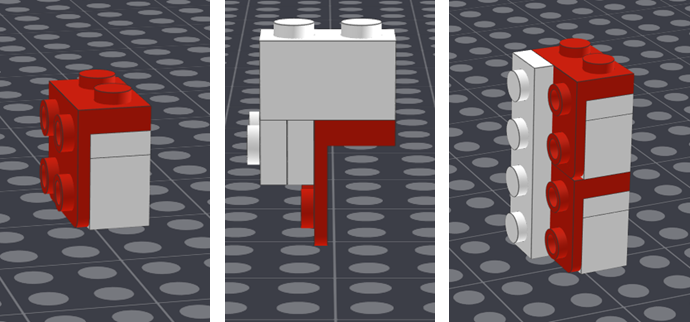
ANGULAR PLATE 1.5 BOTTOM 1X2 2/2, reverse bracket ( Part 99207 )
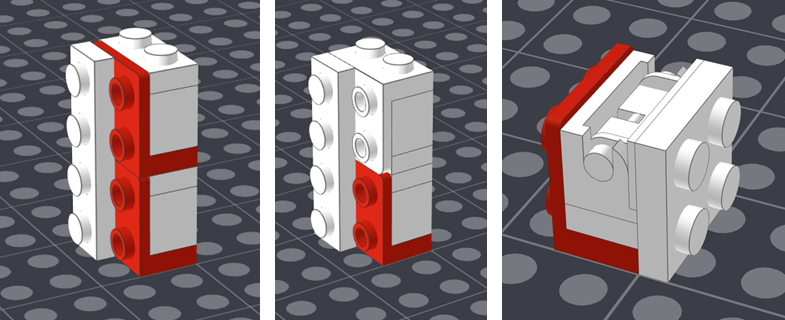
BRICK 1X1 WITH 2 KNOBS( Part 47905 )
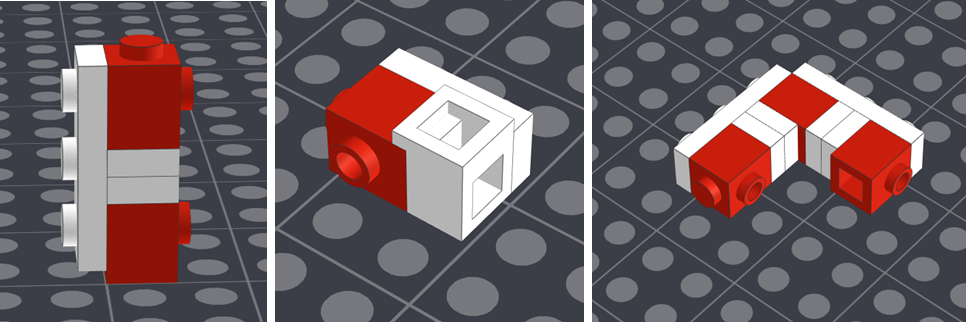
ANGULAR PLATE 1.5 TOP 1X2 ½, bracket ( Part 99781 )
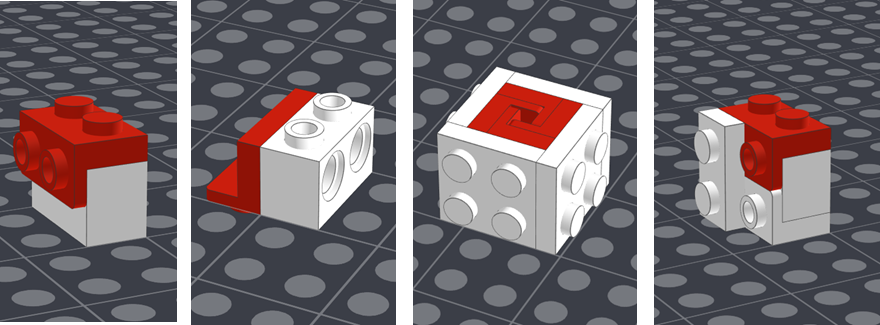
ANGULAR PLATE 1.5 BOTTOM 1X2 ½, inverted bracket ( Part 99780 )

PLATE 2X2X2/3 WITH 2 HORIZONTAL KNOBS ( Part 99206 )

While the parts pictured above don't represent all the SNOT bricks LEGO has ever produced, these are the most common. Hopefully you saw a technique that was new to you!
The pitfalls of SNOT
Now let's get even nerdier. I'll take you deeper into this puddle of SNOT! Not every SNOT stone connection works. Have you heard of LEGO tolerances? Basically, there's a small gap between the LEGO bricks that's necessary to keep the pieces from sticking together when you build with them.

The theoretical space between two stones, separated by two studs, is 16 mm. The logical conclusion would be that a 1x2 brick would be 16mm wide to fill the gap. Well, actually no, that wouldn't work. It would actually be too tight a fit. This means there is a tolerance of 0.1 mm on each side of a stone (or tile or plate). Therefore, a 1x2 brick, like the example above, is actually only 15.8mm wide. So the opening in the example above is actually 16.2 mm. This is what a technique called “Brick Bending” makes possible, as seen in this video tutorial:
However, LEGO tolerances can cause some annoyance when SNOTing. The tolerances only work sideways. There are no tolerances from the bottom up. That would be weird if you think about it because LEGO bricks are made to stack. So when you combine certain SNOT elements in specific ways you run into trouble. Here is an example with brackets:
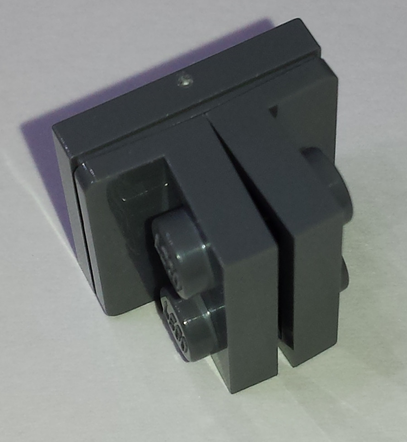
No matter how much you want it, there is simply not enough room to attach brackets together this way. You can force them together, but it will emphasize the elements. Here's another example:
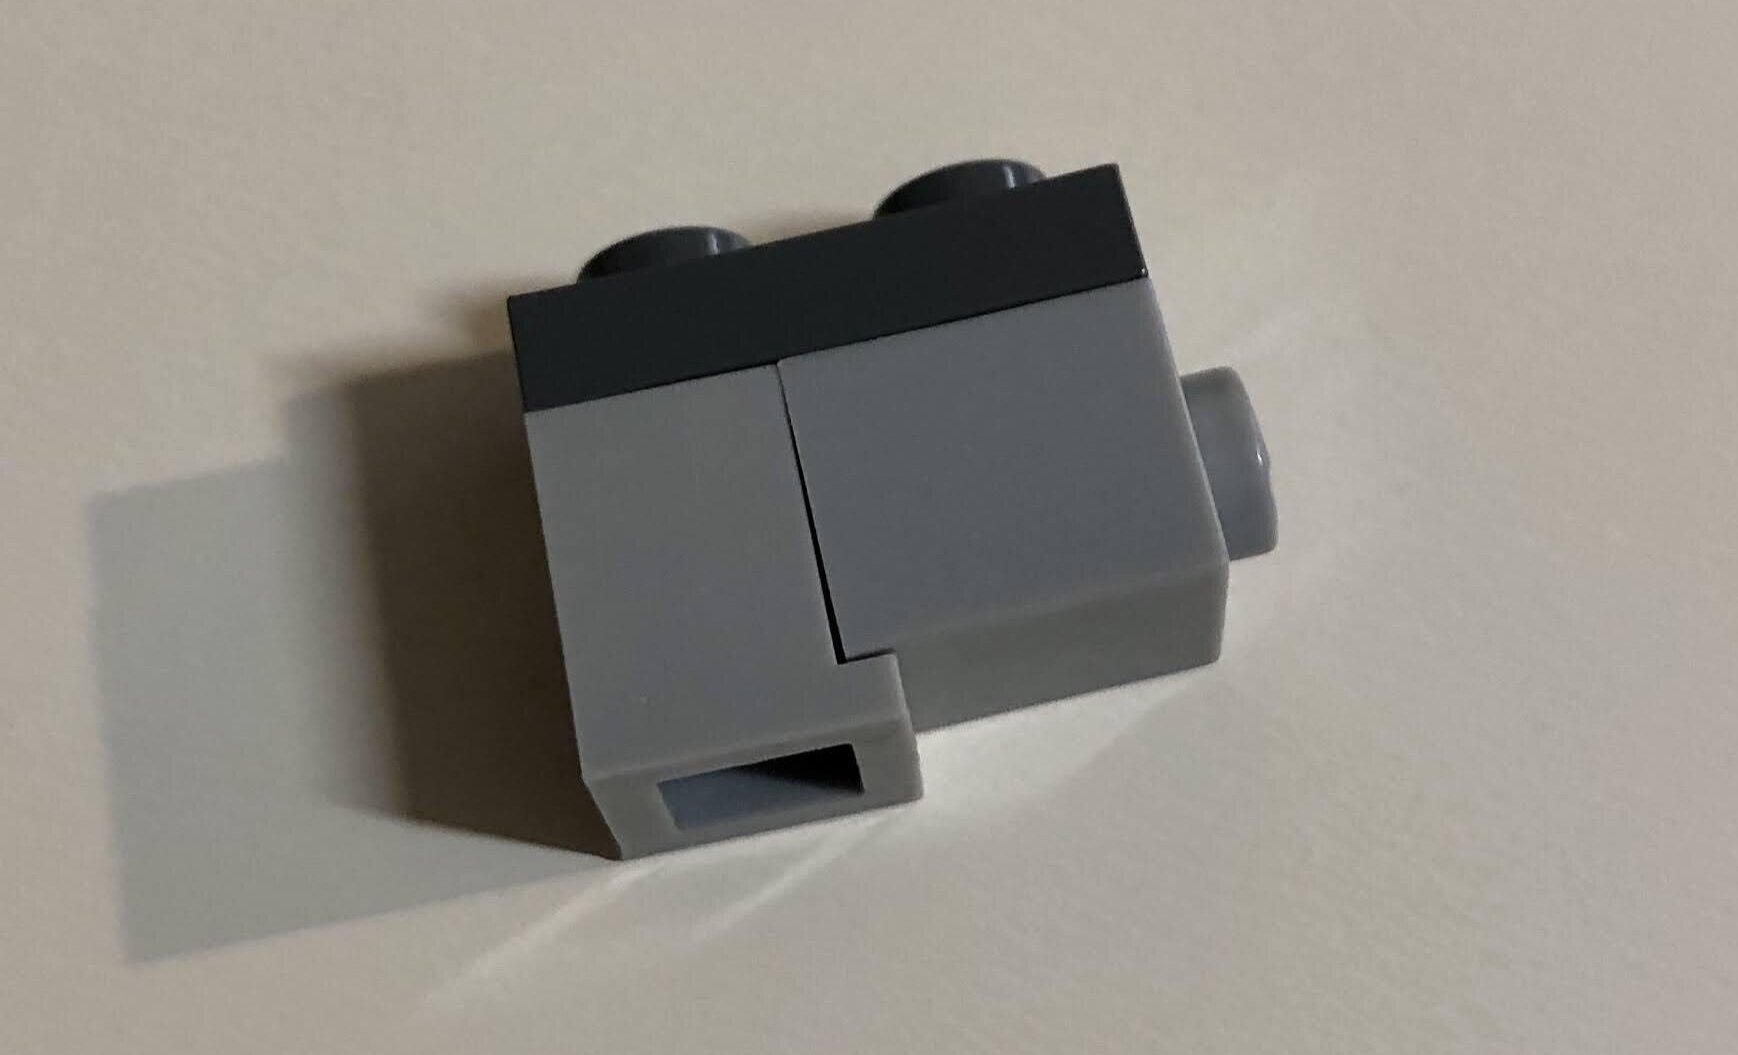
This is a headlight brick (4070) connected to a 1x1 SNOT brick (87087) with a 1x2 plate connecting both exposed studs. You see a gap developing. This installation actually causes stress on the elements.
But wait, shouldn't this be corrected (at least partially) by the 0.1mm tolerance of the headlight brick? Good question! The answer in this case is no. The headlight brick is designed to be exactly two plates thick in the shortest dimension, so it's curious that it doesn't have a 0.1mm tolerance!
Technic SNOT
There is another pitfall to be aware of. It has to do with Technic bricks. You might wonder: isn't a Technic half-pin (4274) placed in a 1x1 Technic brick (6541) basically the same as a regular 1x1 SNOT brick (87087)?
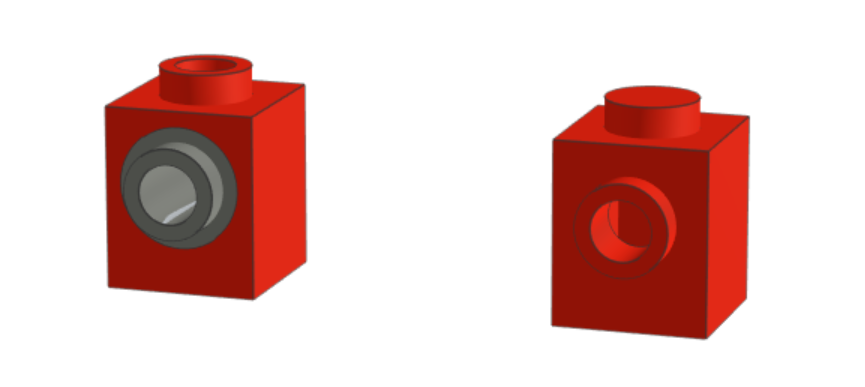
Sorry but no. The center of a technical hole is actually 0.1mm higher than the center of the stud on the 1x1 SNOT brick. This is because there needs to be enough room to attach an entire LEGO style to the bottom of the engineering brick. Annoying! (If you could shave off the “LEGO” logo on the top of the studs, maybe the hole would be 0.1mm lower!?)

That said, many AFOL builders still use the connection because the perceived stress is very small. I've only had trouble with this technique when trying to connect studs in the Technic hole while building in LEGO Digital Designer. When I build with real bricks, I don't think about it.
But LEGO designers build with different rules. That 0.1mm offset gives LEGO designers some extra headaches, I'm sure. For example, if for some reason they need to use Technic bricks and half pegs in a set, they should use the same technique for the entire structure so that the offset is constant throughout the model. That's why there are so many 1x1 Technic bricks in LEGO's Architecture set 21028 New York City. As you can see below in the instructions, the SNOT surface of the entire section of that part of the building must be fixed with Technic bricks, because the assembly in step 9 requires Technic bricks:
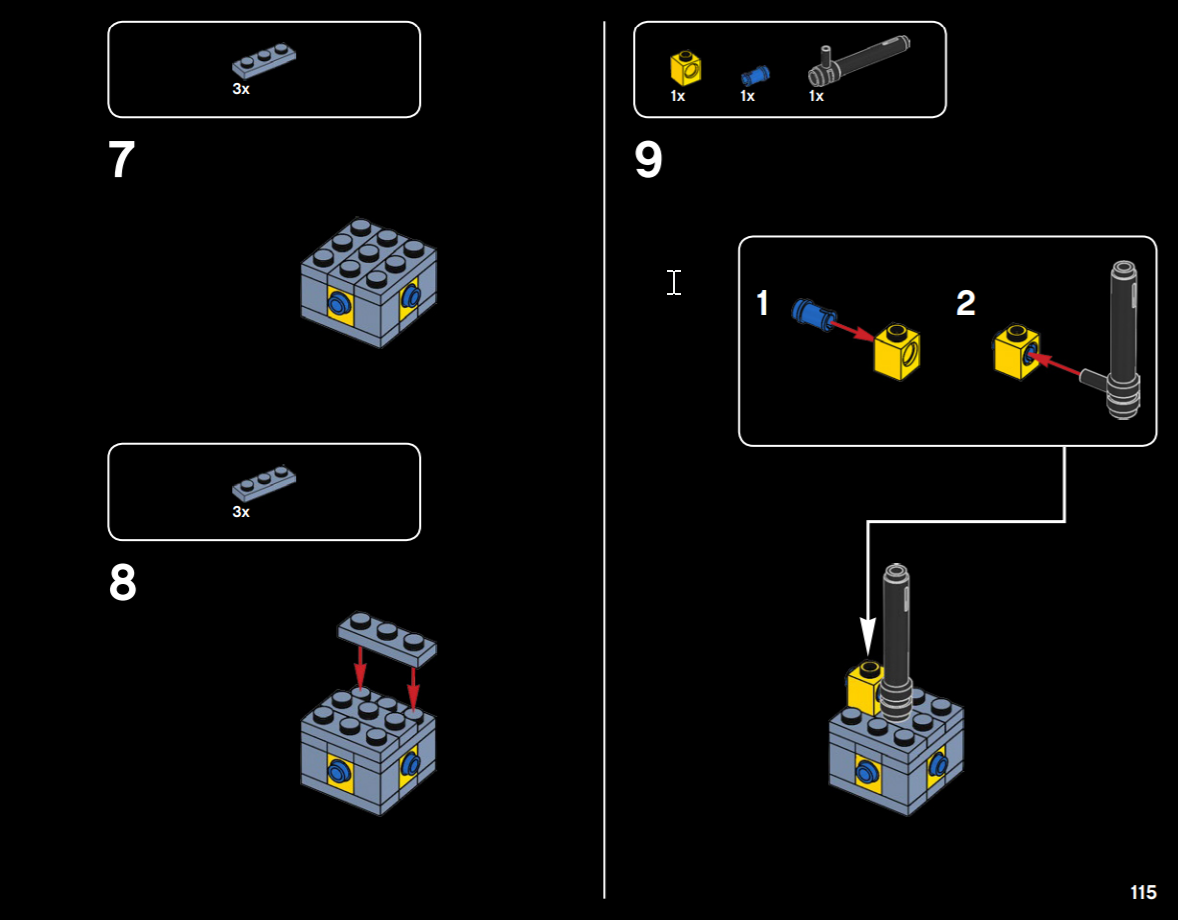
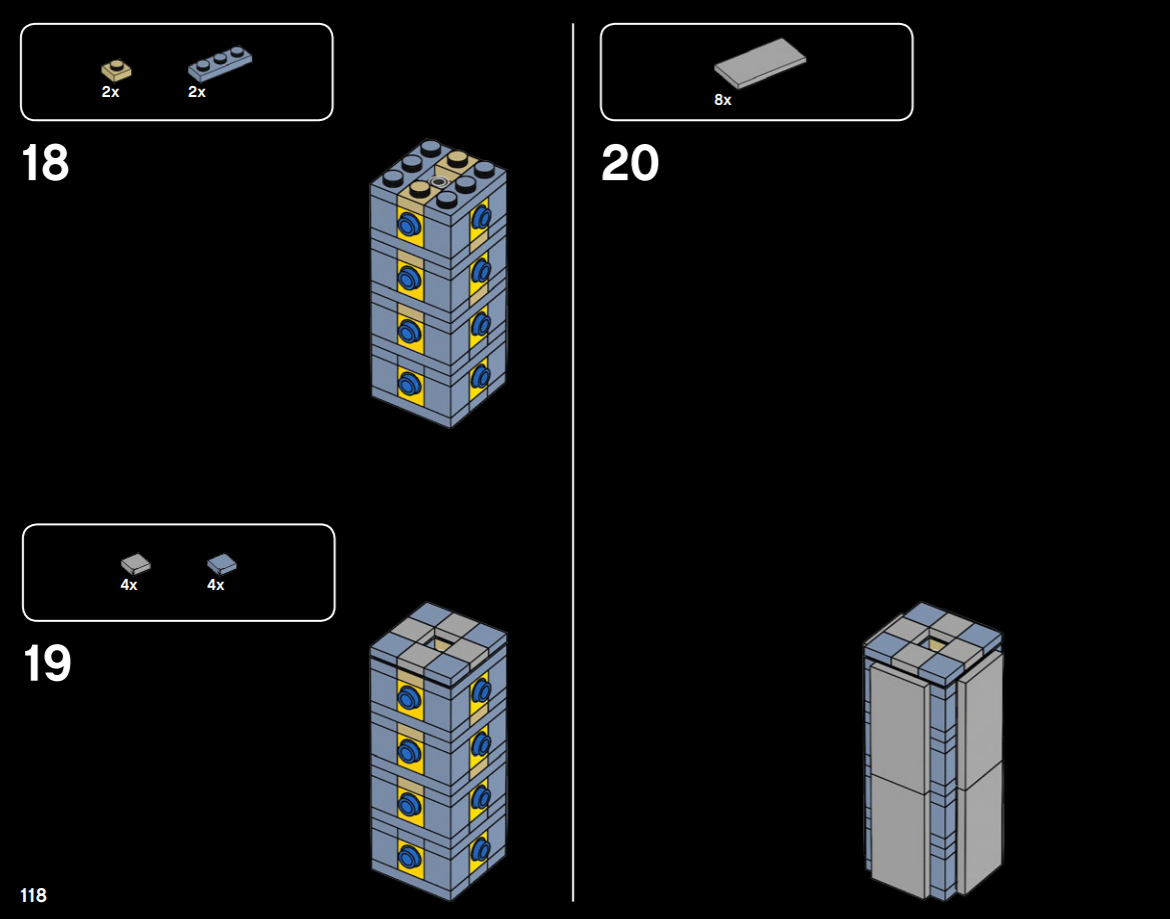
That means a lot of Technic half pins, all because one Technic brick was used at the base to stabilize and strengthen that center column element. I guess the larger number of pieces made that set more desirable? In any case, it served as an example of the difference of Technic SNOT.
So there you have it: the basics of SNOT geometry, a visual glossary of elements and techniques, and a brief summary of some SNOT problems you should be aware of.
That's today's LEGO learning lesson, but we'll soon be creating a new part in this "Learn to Build with LEGO" series, where we'll analyze some more advanced SNOT techniques and implementations.
-

The Best Sets for Gamers. From Minecraft via Super Mario to Dune...
READ MORE -
What is "LEGO SNOT". Part 1 of the 2TTOYS course "learning to build with LEGO"
READ MORE -

This is the real reason why LEGO Star Wars designers hide pink bricks in sets
READ MORE -
10 things you need to know about the LEGO® Icons Medieval Town Square
READ MORE -

Do you remember these vintage LEGO® sets from your childhood?
READ MORE -

The best LEGO® Modular Buildings over the years
READ MORE -

Nice souvenirs for London lovers
READ MORE -
The 9 best Disney gifts for adults
READ MORE -

10 cool LEGO® sets that take you back to your childhood
READ MORE
LATEST LEGO SETS
-
LEGO Mateo's Off-Road Car 71471 Dreamzzz
Regular price €8,49 EURRegular priceUnit price / per€9,99 EURSale price €8,49 EURSale -
LEGO Expansion Set: Bowser's Car 71431 Super Mario
Regular price €25,49 EURRegular priceUnit price / per€29,99 EURSale price €25,49 EURSale -
LEGO Expansion Set: Yoshi's Peculiar Forest 71428 SuperMario
Regular price €8,49 EURRegular priceUnit price / per€9,99 EURSale price €8,49 EURSale -
LEGO Space Base and Rocket Launch Pad 60434 City
Regular price €147,49 EURRegular priceUnit price / per€139,99 EURSale price €147,49 EUR -
LEGO Modular Space Station 60433 City
Regular price €84,99 EURRegular priceUnit price / per€99,99 EURSale price €84,99 EURSale -
LEGO Interstellar Spaceship 60430 City
Regular price €16,49 EURRegular priceUnit price / per€19,99 EURSale price €16,49 EURSale -
LEGO Mining Asteroids in Space 60429 City
Regular price €16,49 EURRegular priceUnit price / per€19,99 EURSale price €16,49 EURSale -
LEGO Space Mech 60428 City
Regular price €8,49 EURRegular priceUnit price / per€9,99 EURSale price €8,49 EURSale -
LEGO Prison Island Police Station 60419 City
Regular price €83,99 EURRegular priceUnit price / per€0,00 EURSale price €83,99 EUR -
LEGO Police Car with Laboratory 60418 City
Regular price €46,49 EURRegular priceUnit price / per€54,99 EURSale price €46,49 EURSale -
LEGO Police Car and Muscle Car Chase 60415 City
Regular price €16,49 EURRegular priceUnit price / per€19,99 EURSale price €16,49 EURSale -
LEGO Fire Station with Aerial Ladder Vehicle 60414 City
Regular price €67,49 EURRegular priceUnit price / per€79,99 EURSale price €67,49 EURSale -
LEGO Fire Department Plane 60413 City
Regular price €50,99 EURRegular priceUnit price / per€59,99 EURSale price €50,99 EURSale -
LEGO Fire Truck with Rescue Boat 60412 City
Regular price €25,49 EURRegular priceUnit price / per€29,99 EURSale price €25,49 EURSale -
LEGO Fire Department Helicopter 60411 City
Regular price €8,49 EURRegular priceUnit price / per€9,99 EURSale price €8,49 EURSale -
LEGO Race Car Transporter 60406 City
Regular price €17,99 EURRegular priceUnit price / per€29,99 EURSale price €17,99 EURSale -
LEGO Rescue Helicopter 60405 City
Regular price €16,49 EURRegular priceUnit price / per€19,99 EURSale price €16,49 EURSale -
LEGO Burger Truck 60404 City
Regular price €16,49 EURRegular priceUnit price / per€19,99 EURSale price €16,49 EURSale -
LEGO Ambulance & Snowboarder 60403 City
Regular price €16,49 EURRegular priceUnit price / per€19,99 EURSale price €16,49 EURSale -
LEGO Blue Monster Truck 60402 City
Regular price €12,49 EURRegular priceUnit price / per€14,99 EURSale price €12,49 EURSale -
LEGO Steamroller 60401 City
Regular price €8,49 EURRegular priceUnit price / per€9,99 EURSale price €8,49 EURSale -
LEGO Go-karts with racers 60400 City
Regular price €8,49 EURRegular priceUnit price / per€9,99 EURSale price €8,49 EURSale -
LEGO Green Race Car 60399 City
Regular price €8,49 EURRegular priceUnit price / per€9,99 EURSale price €8,49 EURSale -
LEGO Princess Market Visit 43246 Disney
Regular price €84,98 EURRegular priceUnit price / per€99,99 EURSale price €84,98 EURSale -
LEGO Elsa's Frozen Castle 43238 Disney
Regular price €37,99 EURRegular priceUnit price / per€44,99 EURSale price €37,99 EURSale
SELECTED FOR YOU
-
LEGO Statue of Liberty 21042 Architecture
Regular price €84,99 EURRegular priceUnit price / per€99,99 EURSale price €84,99 EURSale -
LEGO Paris with Eiffel Tower 21044 Architecture
Regular price €42,49 EURRegular priceUnit price / per€49,99 EURSale price €42,49 EURSale -
LEGO Trafalgar Square London 21045 Architecture
Regular price €99,99 EURRegular priceUnit price / per -
LEGO The Singapore Skyline 21057 Architecture
Regular price €49,99 EURRegular priceUnit price / per€59,99 EURSale price €49,99 EURSale -
LEGO Pyramid of Giza 21058 Architecture
Regular price €118,98 EURRegular priceUnit price / per€139,99 EURSale price €118,98 EURSale -
LEGO Syndney Opera House 10234 Creator Expert
Regular price €429,99 EURRegular priceUnit price / per -
LEGO Tower Bridge from London 10214 Creator Expert (USED)
Regular price €294,99 EURRegular priceUnit price / per -
LEGO Tower Bridge from London 10214 Creator Expert
Regular price €449,99 EURRegular priceUnit price / per -
LEGO Taj Mahal India 2017 Version 10256 Creator Expert
Regular price €449,99 EURRegular priceUnit price / per -
LEGO Las Vegas Skyline 21047 Architecture
Regular price €129,99 EURRegular priceUnit price / per -
LEGO Build your own Architecture buildings with this set Studio 21050 Architecture
Regular price €449,99 EURRegular priceUnit price / per -
LEGO The White House 21054 Architecture
Regular price €109,99 EURRegular priceUnit price / per -
LEGO Washington Lincoln Memorial 21022 Architecture (USED)
Regular price €79,99 EURRegular priceUnit price / per -
LEGO Solomon R. Guggenheim Museum 21004 Architecture
Regular price €174,99 EURRegular priceUnit price / per -
LEGO The Eiffel Tower from LEGO 21019 Architecture (USED)
Regular price €79,99 EURRegular priceUnit price / per -
LEGO Taj Mahal 21056 Architecture
Regular price €119,99 EURRegular priceUnit price / per€0,00 EURSale price €119,99 EUR -
LEGO London Skyline 21034 Architecture
Regular price €34,99 EURRegular priceUnit price / per€39,99 EURSale price €34,99 EURSale -
LEGO The New York Skyline 21028 Architecture
Regular price €42,48 EURRegular priceUnit price / per€49,99 EURSale price €42,48 EURSale -
LEGO 10189 Taj Mahal (USED)
Regular price €299,99 EURRegular priceUnit price / per -
LEGO Taj Mahal India 2017 Version 10256 Creator Expert
Regular price €449,99 EURRegular priceUnit price / per -
LEGO Notre-Dame Cathedral 21061 Architecture
Regular price €194,49 EURRegular priceUnit price / per€229,99 EURSale price €194,49 EURSale -
LEGO Himeji Castle 21060 Architecture
Regular price €134,98 EURRegular priceUnit price / per€159,99 EURSale price €134,98 EURSale
-

LEGO Avatar
LEGO Avatar: Dive into the wonderful world of Pandora! Build with Jake...
-

LEGO Icons
Relive your childhood with LEGO Icons sets, specially designed for nostalgic adults....
-

LEGO Classic
Discover endless building fun with LEGO Classic sets! This collection offers a...


